TL;DR so how long the attack will take?
On fast computer, using one of recommended external SSD drives, connected to USB 3.0 port, with the amount of data typical for CEO/COO/CFO, HR/payroll specialist or average office worker, the whole attack phase should take below 2 minutes.
But on slow computer, and with the amount of data typical to software developer, graphics designer, CAD designer etc., it can take even over 1 hour.
Overview
This page explains, how to calculate the rough time required for attack on the given computer, based on more or less detailed assumptions.
As you could expect, attack performance depends mainly on computer CPU performance and external SSD drive write performance. But when you look at the details, these is a second most important factor: attack operator. And his/her reaction speed.
Pre-boot non-standard behaviors
For most computer users, the boot process is a simple thing. This is mostly because most users are using from 1 to 3 computer brands and simply aren't aware of all small but annoying differences in the boot process between brands.
When you work on a single computer, you are used to its strange behaviors, and you no longer find them strange - eg.:
- if you use Lenovo laptop with "Novo Button", you probably know, that going go UEFI setup requires just pushing it instead of Power button
- if you use MSI gaming laptop, you probably know, that some USB ports can be used to boot other OS, while others not
All such behaviors are at least "non-standard". In fact, almost all hardware vendors have their own non-standard behaviors. And someone who always used only HP laptops, will have to spend some time, until he finds out, how to enter boot menu on Lenovo Ideapad laptop.
That unfortunately affects also Drive Badger - so the below table explains the whole boot process, with possible non-standard behaviors - so attack operator no longer needs to be an expert in computer hardware.
Phases of the boot process
| Id | Phase | Waits for |
|---|---|---|
| S1 | Shutting down the installed operating system | Windows shuts down services automatically, and asks userspace programs, eg. Outlook, to close itself - now, if you configured Outlook to purge Deleted items on close, it will try to show question dialog (invisible to user at this point), and wait until Windows forces it to close. This can delay the restart by up to 2 minutes. |
| S2 | ACPI computer restart | Mostly happens without any problems, but sometimes ACPI fails, especially when Windows Update was in progress of applying updates - just be ready to manually push Power button. |
| H1 | BIOS/UEFI start, internal tests, starting additional firmware (gigabit ethernet, RAID controller, graphics card, server management card etc.) | |
| H2 | Detecting RAID/storage configuration | |
| H3 | Detecting DHCP servers / PXE boot by network interface | This can take up to several minutes, if LAN cable is connected, and no DHCP server responds (despite of the reason). Usually you can skip that by pressing Esc, when you see messages about DHCP/PXE. |
| H4 | Entering boot menu | Shows only if you pressed F9/F11/F12/F10/F8/F2/Del key during previous phases (except Lenovo, where it is different). |
| H5 | Boot menu | Shows devices available to boot from. If you don't see your Drive Badger device here, first try to use different USB port (on MSI), then go to BIOS/UEFI settings and disable Boot mode to Legacy. |
| B1 | MBR and loading GRUB menu | You should see the blue graphical Kali Linux screen with a list of boot modes. Sometimes you can get a black screen, or text screen with just 1 line starting from SYSLINUX. Try changing graphics related settings in BIOS/UEFI. |
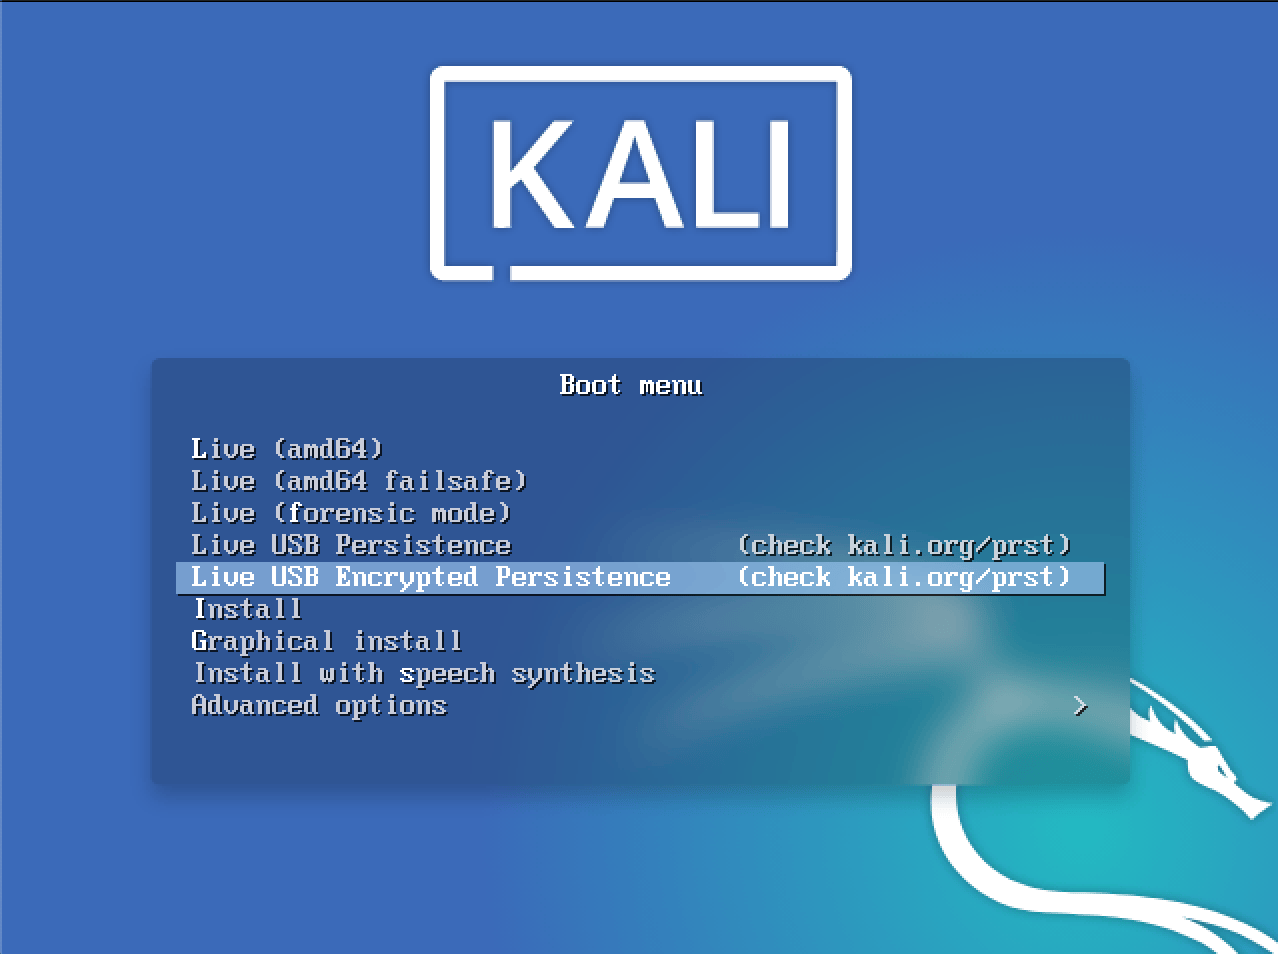
| B2 | GRUB menu | The blue menu screen will wait indefinitely for your action - you need to choose Live USB Encrypted Persistence. In case of emergency just choose the default option, which will run ordinary Kali Linux Live, without access or even visibility of Drive Badger and exfiltrated data. |
| B3 | Configuring initial graphics mode, loading kernel and initrd, booting kernel | After you choose any option, depending on hardware type, either screen will go back to text mode, or a black frame will be opened on top of blue screen. On many Dell computers, the black frame hangs and your only option is to use Power button. |
| B4 | Waiting for password for LUKS-encrypted persistent partition | As above, you can be asked on top of Kali Linux dragon logo, or in text console. Both ways, it will wait indefinitely for operator to enter the password. |
| B5 | PBKDF2 is calculated on given password | Depending on chosen hash algorithm, number of iterations and CPU performance, this can take from single seconds to even a few minutes. |
| B6 | Opening LUKS persistent partition | If given password was invalid, skip to "Waiting for password" phase. |
| B7 | Loading systemd, Kali Linux initial configuration | |
| B8 | Starting system services, including detecting hardware by systemd+udevd, system-level DHCP client and Drive Badger (in background-waiting mode) | |
| B9 | Starting physical console | Since now, you can use the console to run some disguise, or to show system processes and follow the attack. |
| A1 | Drive Badger waits 15 seconds in the background | Wait for possible DHCP network configuration. |
| A2 | Drive Badger waits another 20 seconds if Xorg was started in the meantime (either automatically, or by user) |
Let's give the graphical interface additional 20 seconds to load everything smoothly. |
| A3 | Drive Badger starts processing partition UUID list (the actual attack begins) | |
| A4 | Attack finishes, when last related task finishes (there is nothing waiting and notifying, you have to check manually) | Physical console still works, you can shutdown the computer or continue working on Kali Linux. |
Attack performance factors
As you see, nearly all the above table is related to events that happen before the actual attack:
- some of them can delay the attack (Windows needs to close the background programs, maybe even install updates etc.)
- others will stop the attack permanently, until the operator will react (eg. by entering the password to encrypted persistent partition)
Also, various hardware can be easier or harder to get into boot menu and run Drive Badger. If you're lucky enough and your victim will have the easy hardware, you will go through the boot process literally in seconds. Otherwise, you can spend even hours fighting strange problems with certain hardware.
However on most hardware, booting Drive Badger should not exceed 15 minutes (between shutting down Windows and starting services on Kali Linux) per computer, and this time should drastically decrease with each computer of the same brand and similar model.
The other performance factors of the attack are much more linear:
- fast vs slow computer (in general)
- USB 3.0 vs 2.0 port
- external SSD drive vs slower pen drive
- amount of local data to exfiltrate
- are there any network shares available to exfiltrate?
Phases of the actual attack (A3)
Drive Badger was written to be readable and easy to understand in the first place:
- it was written almost entirely in Unix Shell
- the whole main logic is just ~50 lines in 1 script:
internal/kali/main.sh - all operations called from this script are moved to separate scripts, which wrap all possible complications
How exactly it works:
-
Drive Badger recognizes, where to save the exfiltrated data, and which drives/partitions to skip.
-
It gets the list of partition UUIDs (from
/dev/disk/by-uuiddirectory - so it relies entirely on work done bysystemd+udev). -
Each partition is:
- decrypted (if needed and if the proper key is found)
- mounted
- processed by hooks
- exfiltrated using
rsyncprogram with a set of exclusion rules - if any injector is found:
- remounted as read-write (if possible for current filesystem)
- modified by injector
-
In a second pass, Drive Badger looks for partitions without UUID: unformatted or possibly encrypted by Bitlocker/VeraCrypt. Such partitions are processed like UUID-ones, just in another stage.
Differences between rsync and hooks:
rsyncworks synchronically, copying one partition at a time- hooks are also executed synchronically, just before
rsyncfor each partition, but are expected to create additional tasks in the background (that will work parallel torsync)
Most time-consuming phases, not requiring operator's attention
In general, the most time consuming phase is the actual attack (A3), including:
- matching configured encryption keys to currently processed partition (the more keys you configured, the longer it will take)
- exfiltrating data from network shares (
rsync/wgetfrom FTP)
How to speed up the exfiltration process?
For most bigger attacks, there are 3 essential methods to speed up the whole attack:
-
Handling more than 1 computer at once (when you have several computers at the same place and switching between them is quick enough).
-
Implementing your own, additional sets of rsync exclusion rules - for example, if you're targetting the company using AutoCAD 2013 and you're expecting to find it installed on most computers, it's pointless to copy it from each computer. You will save lots of time and disk space just by adding this rule:
Program Files/Autodesk/AutoCAD 2013. -
Shortening the lists of unassigned drive encryption keys:
- assigning as many keys as possible to particular drives (if you managed to obtain enough additional information about these keys)
- splitting bigger key lists to smaller ones, and configuring them on different Drive Badger devices - eg. separate devices for company management and for software developers
Phases requiring operator's attention
- running the boot menu (H4)
- choosing the proper Kali Linux start mode (B2, "Live USB Encrypted Persistence" option)
- entering password for encrypted partition (B4)
Kali Linux GRUB menu
This is Kali Linux Live GRUB menu (B2):